My presentation on managed metadata in SharePoint 2013
Sunday 23 February 2014
Thursday 20 February 2014
Configuring eDiscovery in SharePoint 2013
eDiscovery is the process of finding, preserving, analyzing,
and producing content in electronic formats as required by litigation or
investigations. With SharePoint 2013 you can now save time and help reduce
legal risk with In-Place Hold, near real-time search, and handle more types of
content. Users can now perform eDiscovery across SharePoint, Exchange, Lync,
and file shares—all from one location. Protecting content is easier by using
In-Place Hold, identifying and reducing the amount of content with queries, and
exporting the results into an offline format that can be handed off for legal
review.
The key components of eDiscovery are:
- SharePoint eDiscovery center
- SharePoint in-place holds
- SharePoint eDiscovery export
- Enterprise-wide Discovery
In this post, we will look at configuring the eDiscovery
center in the SharePoint 2013 and creating a case site that is designed for
in-house legal teams to perform their eDiscovery work.
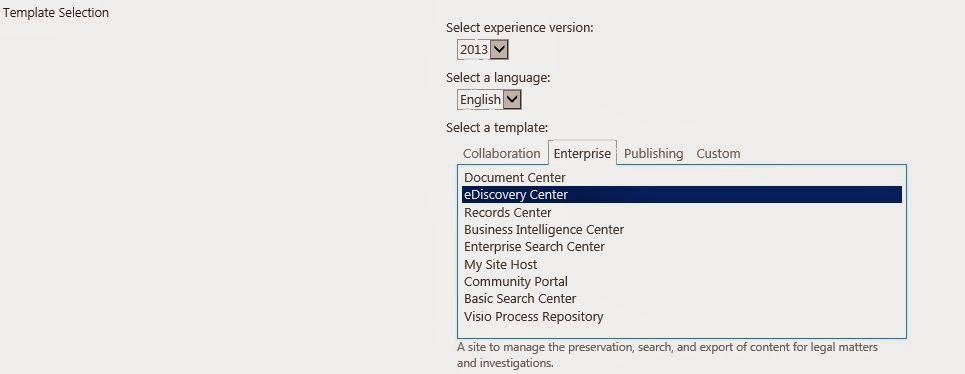
- To create a new site collection, select the “eDiscovery Center” as the template from within the Enterprise templates group and provide other required information and click ok.
- The home page of our site will now look like

- Click on the Create new case button to create a new case.


- The new case site created will have options to creating eDiscovery sets where you can find and hold legal hold on contents and search and export contents. To create a new eDiscovery set, click on the 'New Item' link on the eDiscovery sets section.


- On the new page, click on 'Add and manage source' link to add source contents and Save.

- On the case home page, the In-Place Hold Status will indicate “Processing” for a time and eventually indicate “On Hold”.

- After the hold is placed, if a user edits or deletes content in the site, a copy will be placed in the Preservation Hold Library. The hold also prevents anyone from deleting the site itself. To further filter the content click “new item” under Search and Export. In the New Query Item page, provide a name for the query and add search terms and filters as given below.

- Finally you can use the Download Results options in the Export section to download the results that can be send for the case.

Tuesday 18 February 2014
Tuesday 11 February 2014
Distributed Cache Service - SharePoint 2013
My presentation on the Distributed Cache Service is now on slideshare
http://www.slideshare.net/prajeeshprathap/distributed-cache-service-31069414
http://www.slideshare.net/prajeeshprathap/distributed-cache-service-31069414
Tuesday 4 February 2014
SharePoint 2013 - Updating features
Updating your existing features after deployment to the
production farm is a common scenario in most of the SharePoint environments.
SharePoint supports the concept of updating wsp's by using the Update-SPSolution cmdlet.
Update-SPSolution
-Identity "MySolution.wsp" -LiteralPath "C:\My
Projects\SP2013\MySolution\Packages\MySolution.wsp" -Local -GACDeployment
Updating the solution involves replacing the files and
components with the latest versions including the latest assemblies in GAC. But
solution upgradation does not involve updating the features with changes to
existing items and adding new functionalities to the existing feature. For
feature upgradation, you need to use the Update()
method on the existing features after using the QueryFeatures() method to fetch the features to be
upgraded.
Feature upgrade
scenarios:
SharePoint foundation creates a feature instance when a feature
is activated and tracks the metadata including the version number of the
feature. The feature version number is a four-part number similar to .NET
assembly versions.
To add a new element manifest to a feature upgrade action, you
need to first define the version range element in the feature manifest xml and
add the ApplyElementManifests elements with the
newly added ElementManifest element.
<UpgradeActions>
<VersionRange BeginVersion="1.0.0.0" EndVersion="3.0.0.0">
<ApplyElementManifests>
<ElementManifest Location="Controls\Elements.xml"/>
</ApplyElementManifests>
</VersionRange>
</UpgradeActions>
</Feature>
SharePoint also allows adding custom code behind actions to run
performing upgrade actions by using the FeatureUpgrading event receiver
method. The values that are passed to this method can be mentioned as
parameters in the feature manifest xml and included in the CustomUpgradeAction elements inside the UgradeActions element.
<UpgradeActions>
<VersionRange BeginVersion="1.0.0.0" EndVersion="3.0.0.0">
<CustomUpgradeAction Name="V3Upgrade">
<Parameters>
<Parameter Name="CustomerListNewName">
Tenants
</Parameter>
</Parameters>
</CustomUpgradeAction>
</VersionRange>
</UpgradeActions>
</Feature>
public override voidFeatureUpgrading(SPFeatureRece iverProperties properties, str ing upgradeActionName, System. Collections.Generic.IDictionar y<string, string> parameters)
{
var web = properties.Feature.Parent as SPWeb;
switch (upgradeActionName)
{
case "V3Upgrade":
var listName =parameters[" CustomerListNewName"];
//code to performaction based on the value
break;
default:
break;
}
}
Performing the
upgradation:
After updating the solution using the Update-SPSolution cmdlet, you have to make sure that
the existing features are upgraded as well. For this you can query the features
that need to be upgraded and call the update method on the feature definition
as given below.
$featureId =
New-Object System.Guid -ArgumentList
"8bfc530d-d36e-4720-b0c0-a2edb3638810"
$webApplication =
Get-SPWebApplication "http://mywebapplication.com"
$features =
$webApplication.QueryFeatures($featureId, $true)
foreach($feature in
$features)
{
$feature.Upgrade($true)
}
Sunday 2 February 2014
Path-based site collections vs host-named site collections
SharePoint supports both path-based and host-named site collections. The primary difference between path-based and host-named site collections is that all path-based site collections in a Web application share the same host name (DNS name), and each host-named site collection in a Web application is assigned a unique DNS name.
When you create path-based site collections, you must create the URL for each site collection by starting with the host header path defined by the hosting web application, where the URL to the site collection is the combination of the protocol, host header, the managed path and the name of the site collection. In order to have different host names, multiple web applications are created by configuring managed paths
Host named site collections requires you to create the hosting web application without the traditional host header path. The managed paths used by host named site collections are not configured at web application level but on a farm level.
Subscribe to:
Posts (Atom)