Showing posts with label SharePoint 2013. Show all posts

Sunday, 1 June 2014

Extending the SharePoint 2013 search - Intro architecture and components


SharePoint 2013 introduces a new improved version  of search that is different from the previous versions of SharePoint. The SharePoint search and FAST search has been combined into a single search platform. Instead of the different versions of search like WSS search, foundation etc., in 2013 there is only foundation search and SharePoint server search. Along with these there are lot more new components and topology changes to the search architecture of SharePoint 2013 search.
The Search architecture in SharePoint 2013 includes now components for crawling, indexing content, administration and executing search queries. 


The main components of SharePoint 2013 search are:
  • Admin Component
  • Crawl Component
  • Content Process Component
  • Analytics Processing Component
  • Index Component
  • Query Processing Component

SharePoint 2013 search admin component

The admin component runs the system processes for search, and performs provisioning of other search components within the topology. The main responsibilities of the admin component includes, topology changes and search provisioning, manage the search admin DB, scheduling the crawling and content processing.

Crawl component

Crawling is simply a process of gathering documents from various sources/repositories, making sure they obey by various rules and sending them off for further processing to the Content Processing Component. The crawl component is responsible for crawling content sources in SharePoint 2013. The content sources can be SharePoint sites, Microsoft exchange server public folders, BCS external content sources, file shares, SharePoint sites etc. During the crawl process  crawl component connects to the content sources, passing crawled items to the content processing component by invoking the appropriate indexing connector or protocol handler for retrieving information.

SharePoint 2013 supports three different kinds of crawls:
  • Full: During full crawl, the entire content source is indexed regardless of the fact that only specific items have changed since the last crawl. In short it crawls all content defined in the sources every time a crawl is scheduled
  • Incremental: It crawls content that has been modified since the last crawl based on either a timestamp or a change log. 
Both full and incremental crawling are sequential and dedicated to a content source. It means once launched we'll not be able to launch a second crawl instance in parallel on the same content source, and therefore the changes in content has to wait till the crawling process is completed the be included in the index and searched.

  • Continuous : Continuous crawling is an option that can be used instead of an incremental crawl when we want a content to be continuously crawled. You can achieve maximum freshness of search index as the continuous crawling can be executed in parallel and does not expect the prior crawl to be completed before a new one is launched.

Some important points to consider in continuous crawling is:
  1. Continuous crawling can only be enabled on content type SharePoint sites
  2. The default interval is 15 minutes and can only be changed using the PowerShell cmdlet Set-SPEnterpriseSearchCrawlContentSource
  3. Once started it can’t be stopped or paused.

Content processing component:

The Content Processing receives crawled content from the crawl component and performs does some analysis/processing on the content to prepare it for indexing and sends it off to the Indexing Component. It takes crawled properties as input from the Crawler and produces output in terms of Managed Properties for the Indexer to be indexed. The content processing component makes use of parsers to process the content to generate indexes. If the content processing component is unable to parse a file, the search index will only include the basic file properties.

Analytics processing component

The Analytics Processing Component performs search analytics and usage analytics to improve search relevance. Search analytics refer to the process of detecting analytic information like links, anchor test etc. from the crawled content. The component also processes user initiated analytics like clicks per item etc. which is referred to as usage analytics. Both these analytics output are used to create search reports and generate recommendations and deep links. The results from the analyses are added to the items in the search index. Additionally, results from usage analytics are stored in the analytics reporting database. This makes a lot of since to put this under the Search umbrella for the simple fact that post analytic processing, the analytic data is committed to the index and is used in a variety of ways like boosting relevance of search result or viewing the number of clicks when using the hover panel over a search result.

Index component

The index component is responsible for building the index file. The index file contains crawled properties from content sources, along with ACL that ensures that search results are displayed to users who has proper rights to view the content. The index component stores both crawled items and their associated properties. The component makes use of update groups to allow partial updates  for the changes in the content which makes it more efficient as the change for the content is now only updated within the index of the associated update group instead of the entire content.

Query processing component

The Query Processing Component analyzes and processes queries and results to optimize precision, recall and relevance. It is tasked with taking a user query that comes from a search front-end and submits it to the Index Component.  It routes incoming queries to index replicas, one from each index partition.  Results are returned as a result set based on the processed query back to the component, which in turn processes the result set prior to sending it back to the search front-end. It also performs linguistics processing such as word breaking and stemming before submitting the query to the index component.


That's all for the architecture introduction to SharePoint 2013 search, in the future posts we'll look more into extending the SharePoint search  infrastructure and details.

Thursday, 20 February 2014

Configuring eDiscovery in SharePoint 2013

eDiscovery is the process of finding, preserving, analyzing, and producing content in electronic formats as required by litigation or investigations. With SharePoint 2013 you can now save time and help reduce legal risk with In-Place Hold, near real-time search, and handle more types of content. Users can now perform eDiscovery across SharePoint, Exchange, Lync, and file shares—all from one location. Protecting content is easier by using In-Place Hold, identifying and reducing the amount of content with queries, and exporting the results into an offline format that can be handed off for legal review.
The key components of eDiscovery are:
  • SharePoint eDiscovery center
  • SharePoint in-place holds
  • SharePoint eDiscovery export
  • Enterprise-wide Discovery

In this post, we will look at configuring the eDiscovery center in the SharePoint 2013 and creating a case site that is designed for in-house legal teams to perform their eDiscovery work.
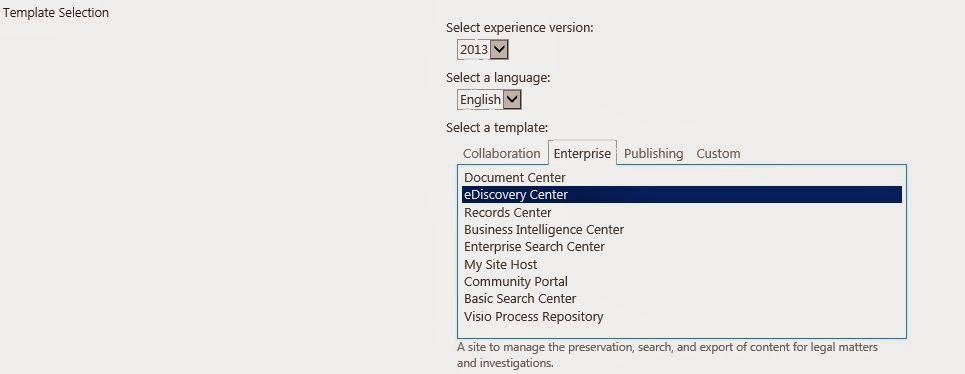
  • To create a new site collection, select the “eDiscovery Center” as the template from within the Enterprise templates group and provide other required information and click ok.

  • The home page of our site will now look like

  • Click on the Create new case button to create a new case.


  • The new case site created will have options to creating eDiscovery sets where you can find and hold legal hold on contents and search and export contents. To create a new eDiscovery set, click on the 'New Item' link on the eDiscovery sets section.


  • On the new page, click on 'Add and manage source' link to add source contents and Save.

  • On the case home page, the In-Place Hold Status will indicate “Processing” for a time and eventually indicate “On Hold”.

  • After the hold is placed, if a user edits or deletes content in the site, a copy will be placed in the Preservation Hold Library. The hold also prevents anyone from deleting the site itself. To further filter the content click “new item” under Search and Export. In the New Query Item page, provide a name for the query and add search terms and filters as given below.

  • Finally you can use the Download Results options in the Export section to download the results that can be send for the case.


Tuesday, 4 February 2014

SharePoint 2013 - Updating features

Updating your existing features after deployment to the production farm is a common scenario in most of the SharePoint environments. SharePoint supports the concept of updating wsp's by using the Update-SPSolution cmdlet.

Update-SPSolution -Identity "MySolution.wsp" -LiteralPath "C:\My Projects\SP2013\MySolution\Packages\MySolution.wsp" -Local -GACDeployment

Updating the solution involves replacing the files and components with the latest versions including the latest assemblies in GAC. But solution upgradation does not involve updating the features with changes to existing items and adding new functionalities to the existing feature. For feature upgradation, you need to use the Update() method on the existing features after using the QueryFeatures() method to fetch the features to be upgraded.

Feature upgrade scenarios:

SharePoint foundation creates a feature instance when a feature is activated and tracks the metadata including the version number of the feature. The feature version number is a four-part number similar to .NET assembly versions.
To add a new element manifest to a feature upgrade action, you need to first define the version range element in the feature manifest xml and add the ApplyElementManifests elements with the newly added ElementManifest element. 

  <UpgradeActions>
    <VersionRange BeginVersion="1.0.0.0" EndVersion="3.0.0.0">
      <ApplyElementManifests>
        <ElementManifest Location="Controls\Elements.xml"/>
      </ApplyElementManifests>
    </VersionRange>
  </UpgradeActions>
</Feature>


SharePoint also allows adding custom code behind actions to run performing upgrade actions by using the FeatureUpgrading event receiver method. The values that are passed to this method can be mentioned as parameters in the feature manifest xml and included in the CustomUpgradeAction elements inside the UgradeActions element.
  <UpgradeActions>
    <VersionRange BeginVersion="1.0.0.0" EndVersion="3.0.0.0">      
      <CustomUpgradeAction Name="V3Upgrade">
        <Parameters>
          <Parameter Name="CustomerListNewName">
            Tenants
          </Parameter>
        </Parameters>
      </CustomUpgradeAction>
    </VersionRange>
  </UpgradeActions>
</Feature>

public override void FeatureUpgrading(SPFeatureReceiverProperties properties, string upgradeActionName, System.Collections.Generic.IDictionary<stringstring> parameters)
{
    var web = properties.Feature.Parent as SPWeb;
    switch (upgradeActionName)
    {
        case "V3Upgrade":
            var listName = parameters["CustomerListNewName"];
            //code to perform action based on the value
            break;
        default:
            break;
    }
}


Performing the upgradation:

After updating the solution using the Update-SPSolution cmdlet, you have to make sure that the existing features are upgraded as well. For this you can query the features that need to be upgraded and call the update method on the feature definition as given below.

$featureId = New-Object System.Guid -ArgumentList "8bfc530d-d36e-4720-b0c0-a2edb3638810"
$webApplication = Get-SPWebApplication "http://mywebapplication.com"
$features = $webApplication.QueryFeatures($featureId, $true)
foreach($feature in $features)
{
$feature.Upgrade($true)

}

Sunday, 2 February 2014

Path-based site collections vs host-named site collections

SharePoint supports both path-based and host-named site collections. The primary difference between path-based and host-named site collections is that all path-based site collections in a Web application share the same host name (DNS name), and each host-named site collection in a Web application is assigned a unique DNS name.

When you create path-based site collections, you must create the URL for each site collection by starting with the host header path defined by the hosting web application, where the URL to the site collection is the combination of the protocol, host header, the managed path and the name of the site collection. In order to have different host names, multiple web applications are created by configuring managed paths

Host named site collections requires you to create the hosting web application without the traditional host header path. The managed paths used by host named site collections are not configured at web application level but on a farm level.

Thursday, 7 November 2013

Bringing Agile into SharePoint - ALM


SharePoint development platform, provides the capabilities to develop, deploy, and update customizations and custom functionalities for the SharePoint sites. The activities that take advantage of these capabilities all fall under the category of Application Lifecycle Management (ALM).

“ALM is a continuous process of managing the life of an application through governance, development and maintenance.”

With the options like BCS, Client OM, Sandbox solutions, WCF based Service Applications and Claims based authentication SharePoint has also significantly evolved as application development platform which opens up a number of extensibility options for the developers. With the power and flexibility to use these tools and customizations the question arises is how to effectively and efficiently manage the activities taking into account the lifecycle of application starting from requirement gathering to release management with consistent quality.

The entire process involves setting up SharePoint with visual studio, TFS, Build automation, Deployment and automated testing.

Setting up DEV environment
To take the full advantage of development capabilities, SharePoint is installed on all development machines. We use scripted installation of SharePoint (SPAutoInsaller) which helps to maintain a similar environment for all development machines and helps the team to configure SharePoint easily.

TFS as a source control

With Visual studio as a development tool, the integration to source control is much easier as the IDE is easily integrated to the TFS. The team creates and works on team projects, checks in the code directly from Visual Studio to TFS.

TFS for build automation
CI builds are configured to ensure that every code that is checked in passes the build with the configured build standards. On every code check-in the build server to pull down the latest source code, compile the code, run any static analysis rules, executes all unit tests and integration tests on the latest code and report any errors along the way. This is a great way of ensuring that even if the developers locally don’t run the static analysis rules or unit tests they will be run here and also ensures that all source code is checked in and is working as expected.


TFS for Code analysis
Code analysis rules help teams to ensure that coding is done according to the standards defined and are followed without fail. The default set of rules are built into Visual Studio which can also be tweaked to meet the specific needs of the teams. Apart from the built in rules which are common to all projects, additional rules like SPDisposeCheck that analyzes the code to see whether all SPWeb and SPSite objects are disposed correctly can be added to the rules. These rules are run on both Visual Studio and TFS to ensure continuous quality.

Automated deployment
Automated deployment is triggered as part of the build process, or as an unattended service to deploy solution packages. The deployment process is a combination of batch files, PowerShell commands and xml configuration files. It is a great way to update the test machines with latest version of the software every time a new version is checked in.

Automated unit, smoke and regression testing
Testing is also configured as part of the CI build process or a nightly build process depending on the teams requirements. Most of the unit tests are executed on every check-in build and regression tests are executed as part of the nightly builds. Team focuses on creating and maintaining a clean set of test cases that help the team get an early feedback on the quality of the product after every release to the test environment.


Wednesday, 6 November 2013

Bringing Agile into SharePoint - CI and DTAP


Creating and maintaining a DTAP (Development-Test-Acceptance-Production) environment helps the project teams and IT department ensure faster and quality delivery at a lower cost. It also reduces the risk of breaking other applications when side by side deployment of components is facilitated in higher environments. The teams get early feedback on the compatibility and performance of the software in Production by simulating the deployment on a production like environment (A). All stakeholders (including the customer) can be involved in the acceptance of the feature before the feature is deployed in Production by following the DTAP street.
The code checked in by the team is rebuild on a daily basis with unit test and deployed daily to a test environment (CI box). All changes to CI and subsequent environments are deployed using wsp's and PowerShell scripts. A fully automated CI process is implemented by a combination of XML configuration files and PowerShell scripts. Having a process like this will also ensure that installation on all environments including development have a similar process.

Environments and purpose
Development (D)

Standalone VM's with self-contained SQL server, SharePoint, Visual Studio and related tools for developers to create and debug solutions.  Developers work on code checked into TFS and are responsible for maintaining a passing build on every check-in. These servers are also used as quick demo environments to end users and building proof of concepts.
The development machines are configured by using PowerShell scripts which makes it easy to configure SharePoint on machines by team members who have minimal knowledge of SharePoint.

Test (T)
This environment is mainly used by IT department. Teams make use of this environment to fine tune installations before moving up to the next farm in the street. This environment has a stable release so testers can perform better integration testing against a specific release build. Project teams use this environment for demos to end users and have installations multiple times before going to A.

Acceptance (A)
This a production like server where the IT department performs final validation of the software before going to production. This environment is not used for final testing, but to use as a stage to get final approval from the PO before going to production. 

Production (P)
This is the final phase of the development process. The installations are all fully automated and have the content to serve the end users!!!

Tuesday, 5 November 2013

Bringing Agile into SharePoint - Quality check


One of the major problems with SharePoint development is that the framework is not designed with testability in mind. It is not easy to replace the SharePoint object model using Mocks/ Stubs which makes practices like unit testing more difficult in SharePoint development.

The main focus will be to use a combination of best architectural practices and isolation frameworks to achieve best results to do Agile in SharePoint. For e.g. isolating SharePoint calls using a Repository pattern makes it easy to mock a repository object in the above layers to isolate SharePoint object model. Building SharePoint solutions using XP techniques helps the teams in faster development, predictable deliveries, better quality, less stress and happy stakeholders

Repositories

Repositories act as mediators, or interface layers, between different parts of an application. Making use of the repository pattern the SharePoint object model can be exposed using a and repository which will be responsible for using the SharePoint API for querying and updating SharePoint list items.

By using a combination of Specification and data mapper pattern with Repositories will allow the team to centralize the SharePoint list access logic and conversion of types. This provides a simplified access mechanism of list data and provide a layer of abstraction that makes unit testing with emulators/mocks much easier
Repository pattern implementation
 

MVP

Separating the logic for the UI from the code that handles user events, fetching data from repositories by using an implementation of MVP allows developers to replace the actual view with a mock object for unit tests.
MVP pattern SharePoint

SharePoint Emulator

With the availability of SharePoint Emulators the isolation of the SharePoint API is much easier compared to the old way of isolating using the Moles or Fakes framework.

In order to incorporate emulators into existing tests you should wrap the relevant code in a SharePointEmulationScope, which accepts EmulationMode enum as a parameter. It is enabled by default which in turn performs run time interception of all Microsoft.SharePoint.dll calls.
[TestMethod]
[TestCategory("Data access layer tests")]
[Description("Test to verify the data mapper functionality")]
public void BuildFromSPListItem_should_create_a_new_object_with_populated_values()
{
    using (new SharePointEmulationScope(EmulationMode.Enabled))
    {
        var dataMapper = new MyObjectDataMapper();
        const string customDescription = "Custom Description";
        using (var emulatedSite = new SPSite("http://localhost:8081/MySite"))
        {
            var listId = emulatedSite.RootWeb.Lists.Add("MyList", "Custom list", SPListTemplateType.GenericList);
            var list = emulatedSite.RootWeb.Lists[listId];
            var listitem = list.Items.Add();
            listitem["Title"] = "mytitle";
            listitem["CustomDesc"] = "Custom Description";
            var myObject = dataMapper.FromSPListItem(listitem);
            Assert.IsTrue(myObject.CustomDesc == customDescription);
        }
    }
}

Smoke tests

Smoke tests are quick, lightweight test or set of automated tests, that confirm that the basic functionality of the sites are working as expected. We use the smoke tests to verify whether the basic standards of internet sites are adapted and are working as expected in all the environments. The smoke tests are executed from a set of configuration files that specify the details of the sites and environments to run against.

By having proper smoke tests, the team can ensure that the site works with the basic functionalities after every upgrade or patches are done on the farm.

Automation tests

The team also creates a set of UI driven automated tests that cover the functional testing of the UI controls. This helps us verify that the whole application including the user interface is functioning correctly. Teams create Coded UI tests that help remove the need for manual regression testing of a functionality. The Coded UI tests simulates the user experience of clicking through the UI controls to verify things are working correctly.